-
Lenovo Tab S8-50: Changing the DPI
 After Lenovo’s latest update for the Tab S8-50 (TABS8-50F_141103), the ro.sf.lcd_density value in the build.prop file changed from 240 to 320. A comparison screenshot can be seen on the right. Click the image to view the larger version.
The two major differences between the two settings of 240 and 320 are the dock placement and, most importantly, the sheer size of everything.
- Dock placement: On the 320 setting, the dock is no longer at the bottom of the screen but the right side of the screen. In the 240 setting, the dock is located at the bottom of the screen.
- Size: Everything (icons/text) is much larger on the 320 setting. This might be better for people that have trouble reading small text. However, based on what I have read online at the Lenovo Forums, it looks like the increased setting results in some GUI glitches as well. You can read more about it here.
To change the ro.sf.lcd_density value back to its original value of 240, the Lenovo Tab S8-50 needs to be rooted. Rooting instructions can be found here. The root file can be found in this forum post.
Once everything is rooted, you can use a file manager like Root Browser or ES File Explorer to edit the system/build.prop file. Look for ro.sf.lcd_density=320 and change the 320 value back to its original value of 240. Don’t forget to make a backup of build.prop before making any changes.
Original build.prop: http://jyong.ca/files/Lenovo Tab S8-50 141103 build.prop
SHA1 of text only (not file): D54B5A5B63334AC22020CE4728080C4257C91C28
Note: There should be 113 lines in the file. If there are 112, the 113th line should be a line break.Update (10/29/2015): Alternatively, you could run adb and use the following command: wm density 240 (add adb shell in front of it if needed) to set the dpi. This will NOT affect your build.prop. If you mess up, you can use: wm density reset. Credit goes to pdinc on the Lenovo Forums (last post on the page).
All credit goes towards the original posters and developers.
-
My Disappointing Ray-Ban RMA/Warranty Experience
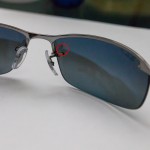 Product: Ray-Ban RB3183 004/82 63-15 3P
Problem: Crack in lens near nose pad screw (see photo)
Resolution time: 37 business days; September 30, 2014 – November 21, 2014September 30, 2014 – Noticed a crack in the right lens
The last time I used my sunglasses was in Vegas and I’m fairly certain that there was nothing wrong with it back then. In any case, I sent out an e-mail to Ray Ban/Luxottica’s Warranty Department to see if they could replace the lenses under warranty. I bought the sunglasses from Amazon earlier in the summer (June 26, to be precise) so I’ve only had the sunglasses for about 3 months.
(more…) -
My Corsair RMA Experience
Prior to September, I don’t think I’ve ever had to RMA anything. However, in the past two months, I have already RMA-ed or will have RMA-ed the following: a WD Caviar Green 3TB hard drive, a SteelSeries Siberia V2, a pair of Rayban RB3183 Sunglasses, and now, a Corsair M60 mouse. Thankfully, the Corsair mouse comes with a two year warranty and I purchased this mouse back in January 2013.
 Product: Corsair M60 – Mouse
Problem: Middle mouse button no longer works
Resolution time: 4 business days; October 10, 2014 – October 15, 2014 -
My SteelSeries RMA Experience

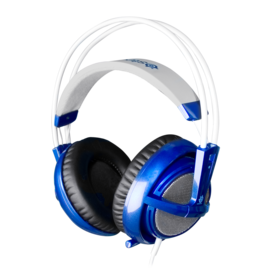
Product: SteelSeries Siberia V2 – Blue
Problem: Mic no longer works. Flipping mic switch on/off doesn’t do anything.
Resolution time: 23 business days; September 5, 2014 – October 7, 2014September 5, 2014
My Siberia V2’s mic stops working. Changing jacks (from front panel to back panel) doesn’t do anything nor does flipping the mic. switch on/off. The only thing that can be heard when flipping the switch on/off is a high pitched squeal. Off to SteelSeries’ support desk I go.
(more…) -
Post Processing Adventures – Incheon Bridge
The purpose of this series “Post Processing Adventures” is to experiment with different post-processing options and to, hopefully, come up with something that looks nice. Tips/feedback/constructive criticism are always welcome. I have also included a link to the original RAW photo so you can make your own adjustments to the photo. I’d love to see what people can come up with. All post-processing will be done in Adobe Lightroom unless otherwise stated.
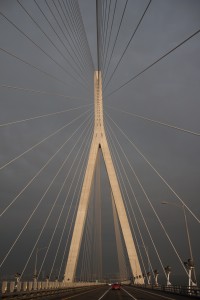 Camera: Canon Rebel T1i
Lens: Canon 18-55mm f/3.5-5.6 IS
Aperture: f/4.0
Focal Length: 18mm
Shutter Speed: 1/640 sec.
ISO: 100
Download original RAW file.Here’s the original photo that I will be working with. Nothing has been edited/changed at this point. It was taken from inside a van on the way to our hotel from Incheon International Airport (South Korea) at around 6:45pm (near sunset).
(more…) -
Taking Photos When You Travel

Nara, Osaka, Japan – Deer Park David Lazar wrote a great piece on How to Photograph People When You Travel. Here’s a little blurb from his post:
“People often tell me that they find it difficult to take good portrait photos when they travel. Approaching strangers and asking to photograph them, usually with a language barrier, can be a daunting prospect. And how do you take a portrait that is creative and meaningful rather than just a simple snapshot of the person? I have developed approaches and techniques over the years to help become confident as a travel portrait photographer.
1. Encounter people that you meet while exploring a place and ask to take their photo, usually after an initial interaction. This is how I’ve taken the majority of my travel portraits.
2. Organise a shoot by paying ‘models’ for their time which involves some kind of meeting and prior planning. I’ve done this on a few occasions, such as shooting the Masai in Kenya, the fishermen at Inle Lake in Myanmar, and some of the Amazon portraits in Brazil.
3. Shoot without any interaction with the person in a documentary/reportage style. Perhaps the most common approach, but it is hard to capture engaging facial expressions and there’s little control over the elements of the scene, which is why very few of my portraits are taken like this.”This is definitely something I’d love to work on and it doesn’t even need to be when I go on vacation. I will definitely have to keep this all in mind the next time I leave the country or leave the house with my camera.
PS. I love it when photographers describe their whole photo taking process. I also like the fact that David shows a comparison shot of what the photo looked like prior to and after post-processing (something I DEFINITELY want to learn more about). Here’s another link to one of his stories about how he got a photo of a Girl with Green Eyes in Bangladesh.